Transformations
This example shows how the animation system can be used to transform models. The example shows an animation of a digital twin of a shipping lock with three bridges, traffic lights, road barriers and a ship. The components of a digital twin can be imported as IFC or glTF files, and can also be created from scratch with the solid modeler. In this example we assume that you do not have any existing models and need to build everything yourself.
Bridge
A draw bridge is constructed from block primitives. A parameter angle specifies the rotation of the bridge. A part 'Fence' is included and repeated two times so that it appears at both edges of the road. The part is named Bridge and stored in library T06.

The main topic of the animation is lock.bru and the topic lock.bru.bridge contains all information on the position and orientation. The angle of the bridge is defined by the topic lock.bru.bridge.angle. Users can specify the angle by setting a value between 0 for fully closed and 100 for full opened. The special geometry subtopic calls the solid by entering the name of the library, the name of the solid, and the parameter for the angle. This parameter is an expression that used the angle subtopic. When the angle is set to 100, the parameter becomes 90.
lock.bru.bridge.angle: 0
lock.bru.bridge.geometry: T06.Bridge(lock.bru.bridge.angle * 0.9)
lock.bru.bridge.translation: -95, 22, 10
lock.bru.bridge.rotation: 0, 0, 270
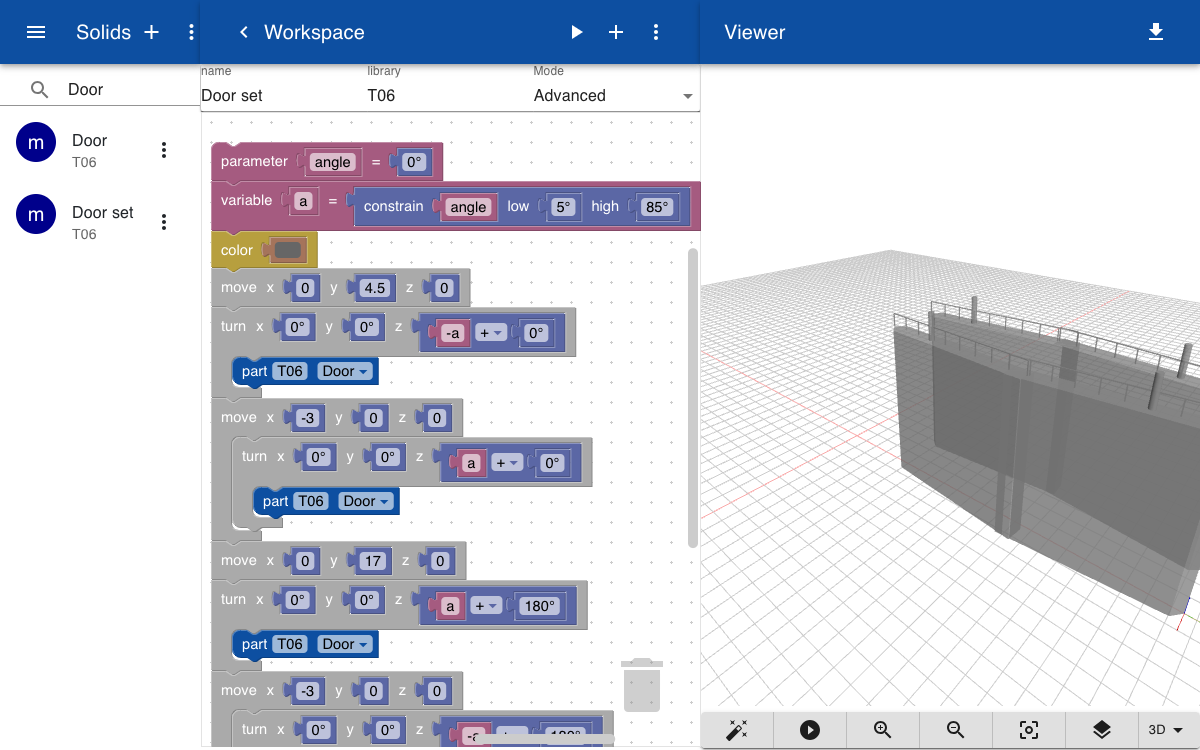
Doors
The shipping lock has two sets of door, one for the lakeside and one for the seaside. Each set of doors includes four doors. The solid has a parameter angle that specifies the opening of the lock: 0 means fully closed and 90 means fully opened. Note that the angle parameter is not used directly to control the rotation of the doors but is used in an expression for variable a so that the actual angle is between 5 and 85 degrees, regardless of the user input. The difference between parameters and variables is that parameters can be specified externally, while variables are only used internally in the script for the solid.
The topics that control the lock doors on the lakeside are defined below. The status of the lock is defined by the lock.bru.lake.lock.angle topic. The door set is moved -90 units along the x-axis.
lock.bru.lake.lock.angle: 0
lock.bru.lake.lock.geometry: T06.Door set(lock.bru.lake.lock.angle * 0.9)
lock.bru.lake.lock.translation.x: -90,
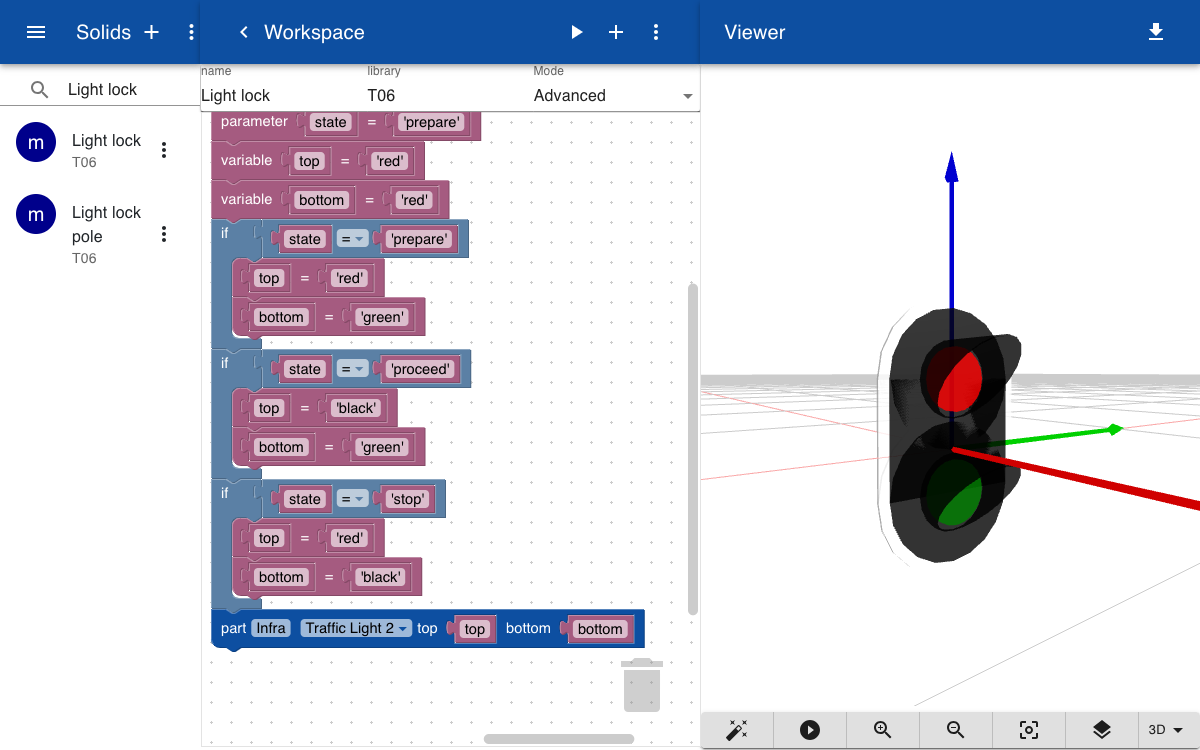
Light
There are two light signals on the lakeside of the lock. The solid Light lock includes a part Trafic light 2 which has parameters for the color of the top light and the color of the bottom light. Instead of controlling the colors of both the top and bottom light we use a parameter state, which can be stop, prepare or proceed. Three if statements are used to set the color of the top and bottom light, depending on the state.
There are topics for the left and right-hand light of the lake entrance of the dock. The state of both lights are controlled by the topic lock.bru.lake.light.state.
lock.bru.lake.light.state: 'stop'
lock.bru.lake.light.right.geometry: T06.Light lock(lock.bru.lake.light.state)
lock.bru.lake.light.right.translation: -109, 4, 8
lock.bru.lake.light.right.rotation: 0, 0, 180
lock.bru.lake.light.right.scale: 2, 2, 2
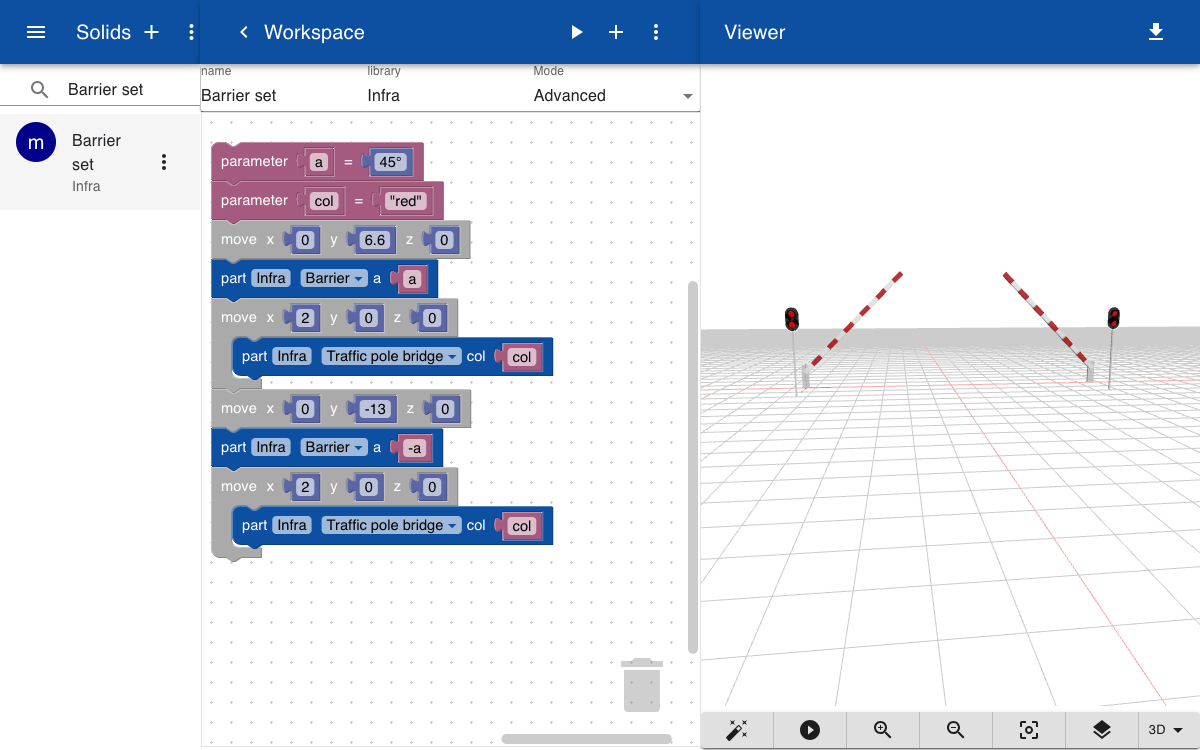
Barrier
There are two sets of road barriers for the draw bridge and for the roll bridge. The solid Barrier set includes two solids Barrier, with a parameter angle, and two solids Traffic pole bridge, with a parameter for the color of the light.
The topics for the position and status of the right lakeside barrier include the color of the light and the angle of the barrier as a percentage between 0 and 100.
lock.bru.lake.barrier.angle: 0
lock.bru.lake.barrier.color: 'red'
lock.bru.lake.barrier.right.geometry: Infra.Barrier set(lock.bru.lake.barrier.angle * 0.9, lock.bru.lake.barrier.color)
lock.bru.lake.barrier.right.translation: -95, -10, 10.5
lock.bru.lake.barrier.right.rotation: 0, 0, 270
Dam
The shape of the dam is created by a solid Base for the shape of the lock. This shape is created by extruding a profile with the shape of the slanted terrain and the channel in the lock. Some other wedges and blocks are added to the left and right as a base for the road.
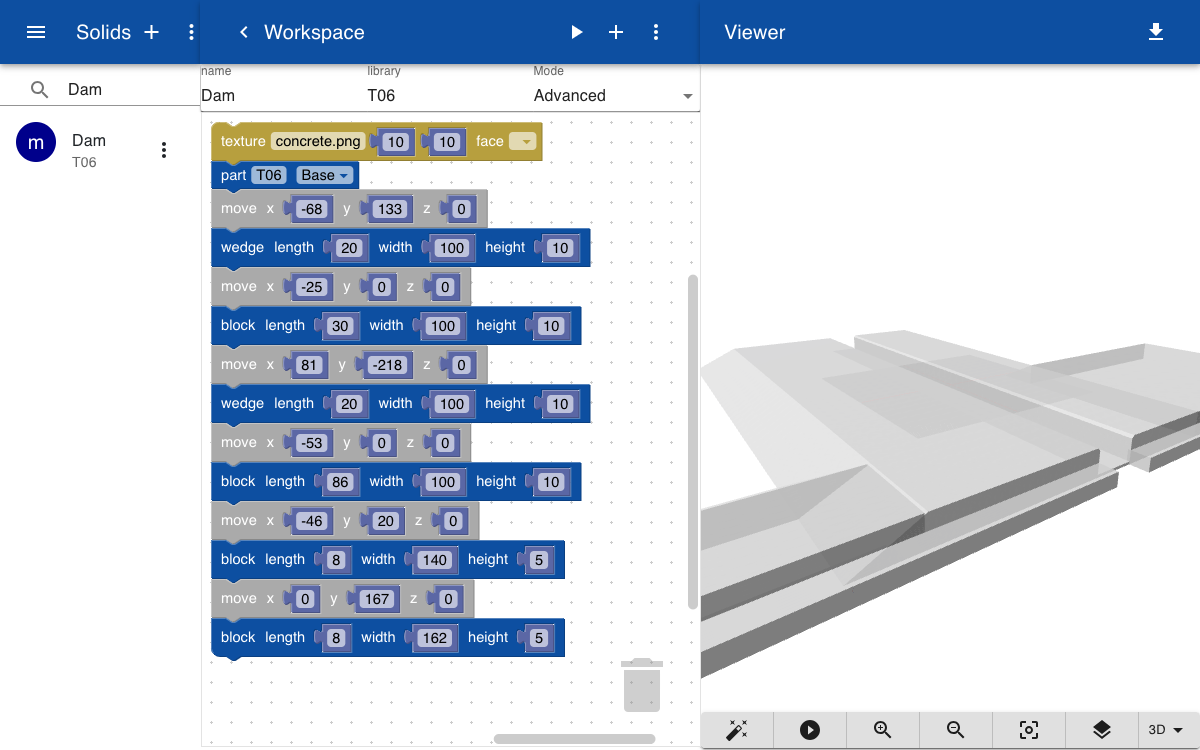
Note that this solid does not have any parameters. Instead of linking the geometry to the name of the script we can include a static glTF file. This file is automatically created when the solid is saved. The advantage of using static glTF files over solids is that the rendering is faster.
lock.bru.terrain.geometry: T06.Dam.gltf,
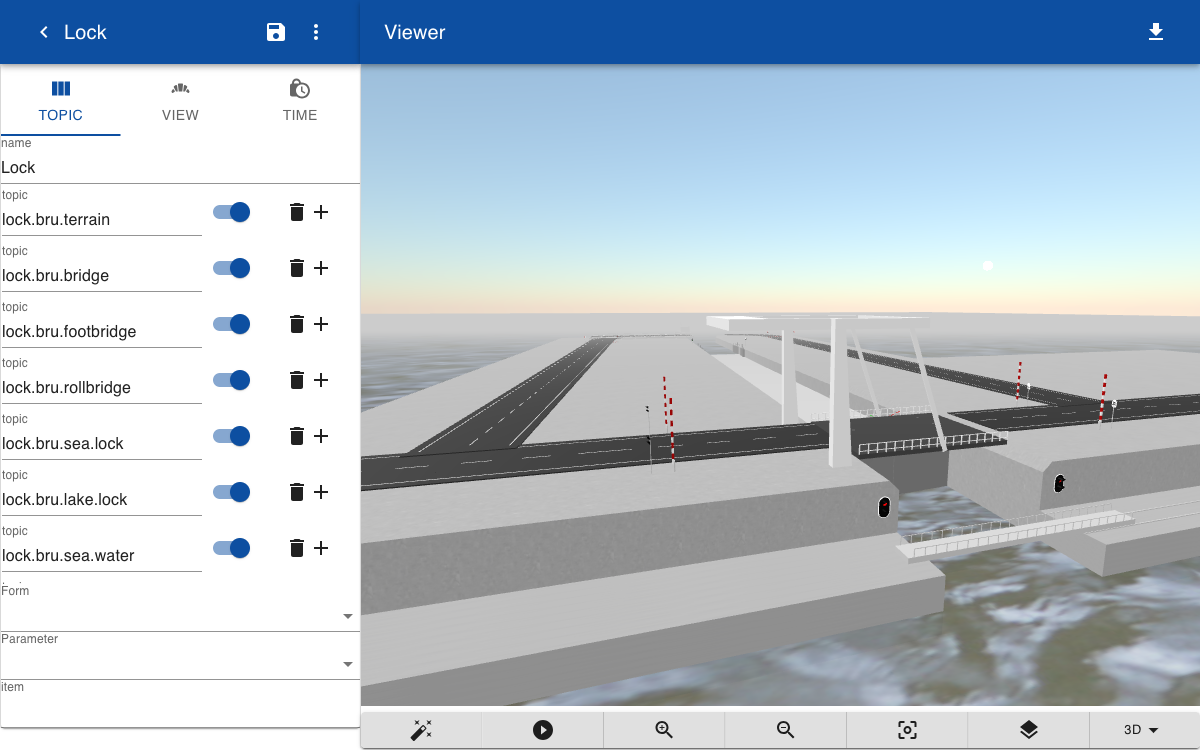
Model
To create an animation a new model is created and all topics for the various elements are loaded in the topic view.
To change the angle of the bridge you can open the topic lock.bru.bridge.angle in another browser and set the value to 45. The model should be updated automatically since it is automatically subscribed to updates of all topics that are included in the model.
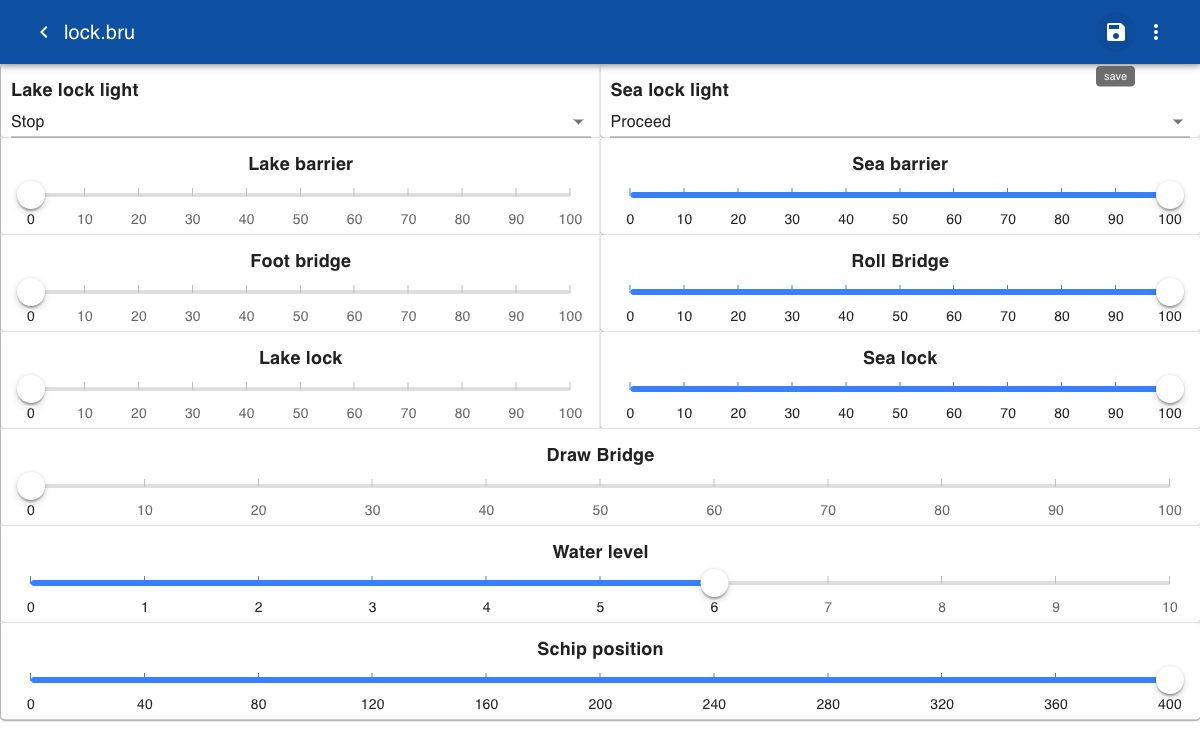
Form
As an alternative to entering new topic values with the keyboard you can also create the following form. All topics are relative to the main topic lock.bru.
Lock

lake.light.state:Lake lock light
[
prepare,
proceed,
stop,
]
|6

sea.light.state:Sea lock light
[
prepare,
proceed,
stop,
]
|6

lake.barrier.angle:Lake barrier
[0|100]
|6

sea.barrier.angle:Sea barrier
[0|100]
|6

footbridge.extension:Foot bridge
[0|100]
|6

rollbridge.extension:Roll Bridge
[0|100]
|6

lake.lock.angle:Lake lock
[0|100]
|6

sea.lock.angle:Sea lock
[0|100]
|6

bridge.angle:Draw Bridge
[0|100]

water.level:Water level
[0|10]

ship.position:Schip position
[0|400]
To open the form go to the items section and search for lock.bru. When clicking on the item the system searches for forms that match any subtopics in the item. In this case the form above with name Lock is opened. You can now drive the animation by changing the values of the sliders and drop-down menus.
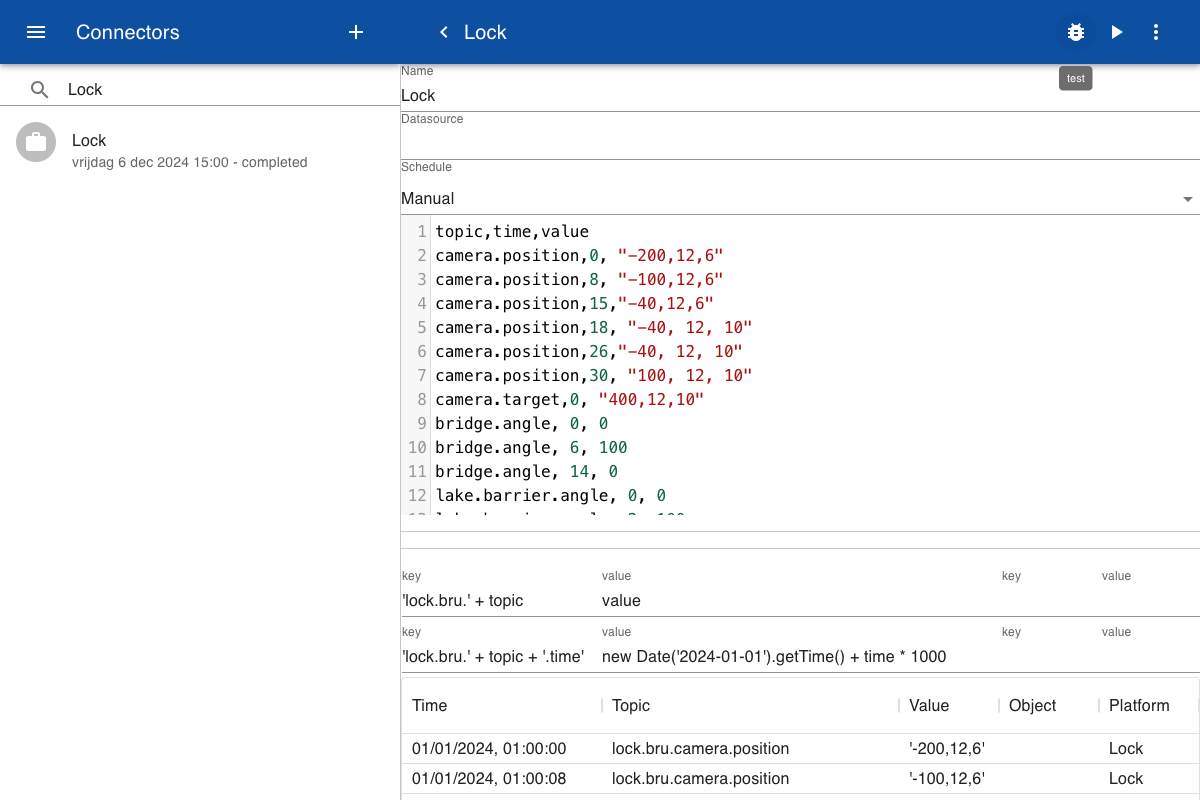
Connector
You can also automatically update the model by creating a connector that updates the various subtopics under lock.bru. For example, the connector can update the water level by making a call to a web service with real time water level information. In this example we set the values of the topics by importing a CSV file. The file has three headers: topic, time and value. When running the connector the name of the topic is defined by the expression in the key field. In this case it is lock.bru followed by the value in the first column of the CSV file. The time is set to a fixed date 2024-01-01 plus the value in the time column multiplied by 1000. This is because the time is specified in milliseconds. Click test to check that all topics, values and times are correct and then Run to actually import the data.
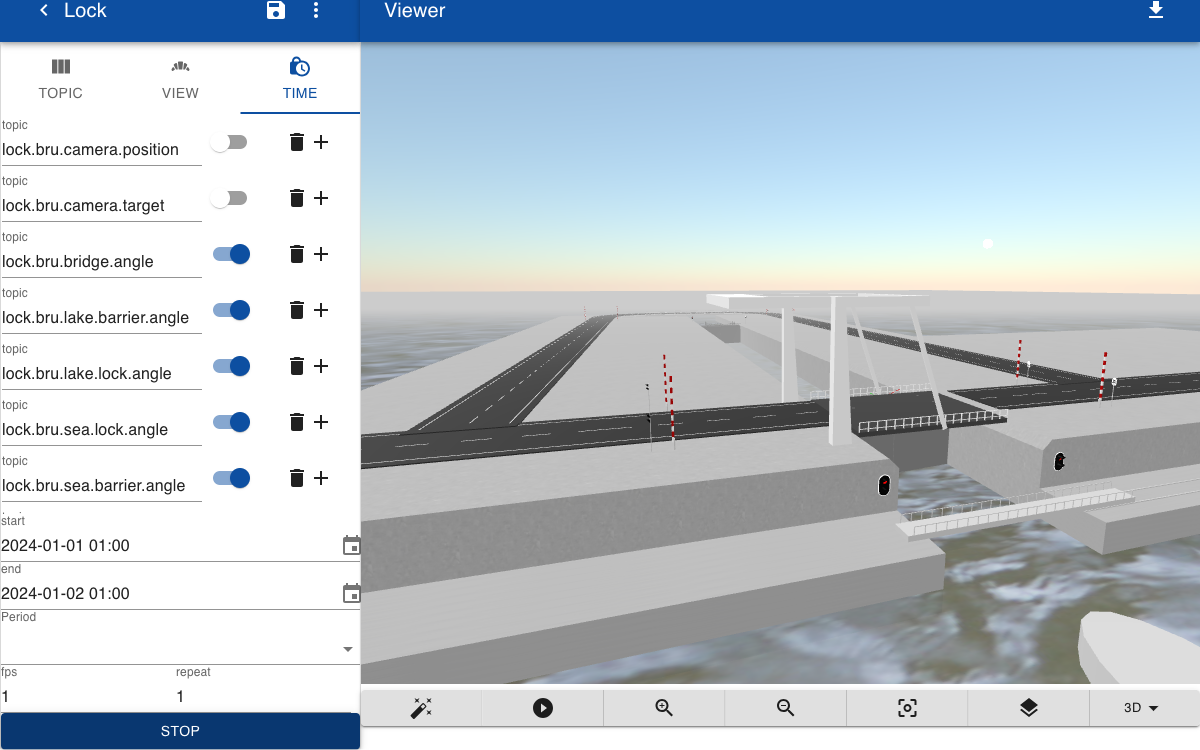
Animation
To start the animation, click on the Time tab and include all topics that you want to animate. Note that in this example we have disabled animation of the camera position and target. Next, specify the start and end time for collecting historical data on the topics listed. When ready click on the Animate button.
Note: You can also watch a video of this animation is the video section. This video includes more details on the setup and also shows the view from inside a ship in the lock by enabling the camera animation.